The Refrigeration Cycle Explained Simply: Latent Heat, Sensible Heat and the Four Components
A walkthrough of the vapour-compression refrigeration cycle and the heat-transfer principles every F-Gas candidate needs for the City & Guilds 2079 exam.

Ask any experienced engineer what separates a confident technician from someone who just swaps parts, and they will tell you the same thing: understanding the refrigeration cycle. It can look intimidating on a wiring diagram, but once the basic principles click into place, no one can ever take that knowledge away from you. This post walks through the vapour compression cycle the same way you would explain it to an apprentice on a hot afternoon — and ties it straight back to what the City & Guilds 2079 F-Gas assessment expects you to know.
Start With Water, Not Refrigerant
Before refrigerant ever enters the conversation, it helps to think about something everyone already understands: water.
Take a block of ice at 31°F. Add heat and it climbs to 32°F, where it begins to melt. Here is the part that matters:
As long as you have a mix of ice and water — even just a grain of ice left — the temperature stays the same. It is a change in state, but no change in temperature.
That hidden energy, absorbed while the temperature holds steady, is latent heat (sometimes called the saturated condition). Once the last sliver of ice has melted and you have 100% liquid, adding more heat finally pushes the temperature up — 33°F, 34°F, and so on. That temperature change with no change of state is sensible heat.
The same thing happens again at the top end. Water sits at 212°F while it boils; you must pump in a great deal of energy to convert every molecule to steam, but the temperature does not move until it is 100% vapour. Then sensible heating resumes.
Hold onto these two ideas:
- Latent heat — change of state, no change in temperature (a saturated mix of liquid and vapour)
- Sensible heat — change in temperature, no change of state
Refrigerant behaves in exactly the same way. The only difference is that engineers have selected refrigerants that boil and condense at convenient pressures and temperatures so we can move heat around a building.
The Four Components
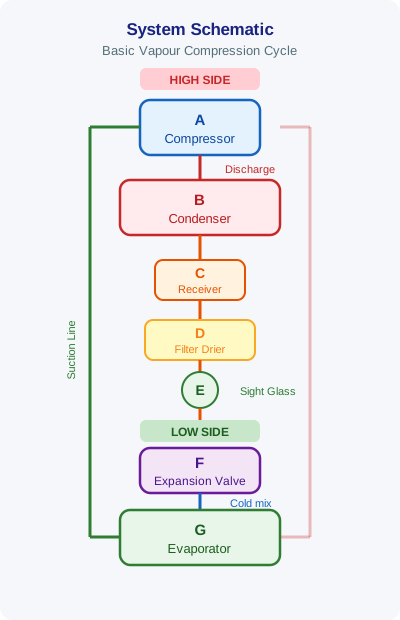
Every system you will ever touch — comfort cooling, commercial, industrial refrigeration, a domestic fridge — relies on the same four components:
- Compressor — the vapour pump, the heart of the system
- Condenser — the heat rejector
- Metering device — the pressure dropper
- Evaporator — where the cooling actually happens
Split the system in two: the evaporator lives inside the conditioned space, the condenser lives outside. Your customer only cares that cold air comes out of the supply vent — it is our job to understand why it does.
Pressure and Temperature Move Together
The whole cycle hinges on one relationship. In a fixed volume of refrigerant, if you raise the pressure you raise the temperature; if you drop the pressure you drop the temperature. That is the practical takeaway from Gay-Lussac’s law, and it is the single most useful idea on the shop floor.
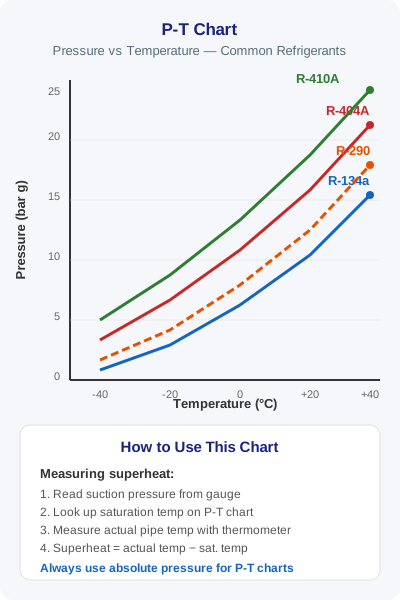
It is also why your pressure–temperature chart is so powerful. Whenever the refrigerant is saturated — a genuine mix of liquid and vapour — pressure tells you temperature directly. Clip your gauges on, read the pressure, and you know the saturation temperature for that refrigerant. This is the foundation of measuring superheat and subcooling, both of which appear throughout the F-Gas syllabus.
Following the Refrigerant Around the Loop
Let’s trace a healthy R410A system on a 90–95°F day.
Compressor — the pressure increaser. Low-pressure vapour enters through the large suction line. The compressor squeezes those molecules into a much smaller discharge line, raising the pressure to roughly 340 psig. On the chart, 340 psig for R410A equals a saturation temperature of about 105°F — but the discharge line surface runs near 165°F because of superheat and winding heat. That is the hottest point in the system.
Condenser — the heat rejector. The discharge gas is far hotter than the 90–95°F outdoor air, and heat always flows from hot to cold. Watch the three stages:
- First the gas dumps roughly 50°F of sensible heat as it falls towards the condensing temperature.
- Then, at the first droplet of liquid, it becomes saturated. The condenser fan keeps rejecting heat, so more vapour turns to liquid while the temperature holds at 105°F — this is latent heat removal.
- Once it is 100% liquid, sensible cooling resumes, dropping the liquid a few more degrees to give us subcooling (say 95°F against a 105°F saturation temperature, or about 10°F of subcool).
That subcooling is your proof the refrigerant has fully condensed — essential, because the next component only works on liquid.
Metering device — the pressure dropper. Whether it is a fixed orifice, capillary tube, TEV or electronic expansion valve, the job is the same: force high-pressure liquid through a tiny restriction. Pressure drops, and temperature drops with it. On the evaporator side the pressure now reads around 118 psig — about 40°F for R410A. The refrigerant leaves as a low-temperature saturated mix, roughly 80% liquid and 20% vapour.
Evaporator — where the cooling happens. The blower draws warm return air (say 80°F) across the cold 40°F coil. That warmth boils off the liquid:
- While liquid and vapour coexist, the coil stays at 40°F — latent heat absorption, and this is what chills the air to around 60°F at the supply vent.
- Once the last drop boils away to 100% vapour, the refrigerant picks up superheat — typically about 12°F of sensible heat — before heading back to the compressor.
The useful cooling effect happens while the remaining liquid in the evaporator is boiling off. That is why we want a good portion of liquid entering the evaporator — and why running an air conditioner on a very cold day makes little sense, because there may not be enough load to boil that liquid off properly.
Superheat matters for a second reason too: that superheated vapour cools the compressor windings. A discharge line that is excessively hot is often a sign the system is low on refrigerant.
Why This Matters for F-Gas Certification
The City & Guilds 2079 / F-Gas assessment assumes you genuinely understand this cycle, not just that you can name the parts. The theory examined in the basic thermodynamics and refrigerant behaviour skill group draws directly on everything above:
- Reading saturation temperatures from pressure–temperature charts (Skill Group covering refrigerant fluids and their characteristics)
- Diagnosing superheat and subcool to confirm correct charge — the backbone of leak-free servicing under Article 3 (prevention of emissions) and Article 4 (leak checking requirements)
- Understanding heat transfer well enough to commission and fault-find without venting refrigerant, supporting the recovery and handling duties in Annex competence requirements
When the practical and theory papers ask why a discharge line is hot, why subcooling confirms a full condenser, or why a flooded compressor is a hazard, they are testing the exact chain of reasoning we have just walked through.
How F-Gas Exam Prep Fits Into This
Reading about the cycle is one thing; recalling it under exam pressure is another. The F-Gas Exam Prep app is built to bridge that gap:
- 460+ exam questions across every City & Guilds 2079 skill group, including dedicated thermodynamics and refrigerant-behaviour banks that drill the latent/sensible heat distinction.
- Mock exams that mirror the real City & Guilds 2079 format, so the timing and question style feel familiar on the day.
- AI voice challenges that let you talk through the refrigeration cycle out loud — the same way you would explain it to a colleague — for active, interactive revision.
- Detailed explanations for every answer, so a wrong response on subcooling or superheat becomes a quick lesson rather than a guess.
Master the heat transfer and the four components, practise until the pressure–temperature relationship is second nature, and the assessment stops being something to fear. Like every good engineer says — once you get it, no one can take it away from you.
Start Practising Today
Download the F-Gas Exam Prep app and study with 460+ practice questions, mock exams, and detailed explanations.