Charging R-410A Into an Air Conditioner: Superheat, Subcooling and Safe Technique
How to charge R-410A into a fixed-orifice AC system using superheat and subcooling, plus the F-Gas rules on leaks, venting and records.
Charging a system by weight to the nameplate figure is the gold standard. In the real world, though, you’ll often be topping up a system that’s been recovered, part-charged or disturbed, and you need to confirm the charge from how the system actually runs. In a training video, AC Service Tech LLC added R-410A step by step to an undercharged split air conditioner with a fixed orifice, showing what happens to the pressures and temperatures along the way.
The video was filmed in the US, so it uses °F, psi and pounds. Below I’ve given approximate metric equivalents and added the UK F-Gas angle you’ll need for your City & Guilds 2079 assessment.
Connecting the Gauges and Purging the Hoses
The procedure starts before any refrigerant moves:
- Make sure the manifold valves and the low-loss hose fittings are all closed.
- Remove the service port caps. On sites the public can reach, these will be locking caps, so carry the right key.
- Connect the red hose to the small liquid line and the blue hose to the large vapour (suction) line. Do it quickly and confidently, because good rubber seals mean less refrigerant escapes.
- Purge air from the hoses. With the system off, open both manifold handles together so system pressure pushes the air towards the centre hose.
“You don’t want to just leave it open for a very long time but you also don’t want to get air into your system.”
If you purge with the system running, the video recommends doing the vapour side first and then the liquid side, where a brief flash of liquid confirms the hose is full of refrigerant.
The presenter says venting is bad for the ozone, but that’s wrong for R-410A. It has an ODP of zero. The problem is global warming: R-410A has a GWP of 2,088. Under Article 3 of Regulation 517/2014 (as retained in GB law), intentional release of F-gases is prohibited, and technicians must take all technically and economically feasible precautions to minimise unavoidable releases. Keep any hose purge brief, or evacuate the hoses with your vacuum pump before connecting.
Why R-410A Comes Out of the Cylinder as Liquid
The cylinder in the video was upside down. R-410A is a 50/50 blend of R-32 and R-125. It’s near-azeotropic, with negligible glide, but it should still be charged as a liquid so the blend stays in its intended proportions. Check whether your cylinder has a dip tube before you decide which way up it goes. Cylinder identification, labelling and handling all come up in the 2079 refrigerant handling skill group.
Zero the scale before you start, so you know exactly how much you’ve added. You’ll need that figure for the service record.
Pre-Checks: Airflow, Filter and Run Time
Before reading the charge, the technician confirmed:
- Indoor airflow. The rule of thumb used is 400 CFM per ton (roughly 190 l/s per 3.5 kW). The 2-ton unit was moving about 751 CFM, which is about right.
- Filter is clean.
- Metering device is a fixed piston/orifice, so the total superheat method applies. A TEV system would normally be charged to subcooling.
- Indoor temperature is at least 70°F (about 21°C). With a low heat load, your readings won’t be reliable.
Then let the system run. Give it at least 3 minutes to see whether the suction saturation temperature climbs above freezing, then 10–15 minutes before you make a final judgement on the charge.
Diagnosing the Undercharge
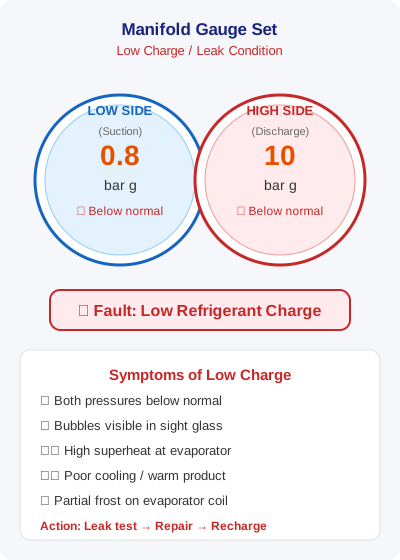
The first readings were textbook. The suction pressure converted to a saturation temperature below 32°F (0°C), so the evaporator was running below freezing and would frost.
“Anytime that our saturated temperature is below 32° it’s either one of three things — it could be low refrigerant charge, low indoor airflow, or a liquid line restriction.”
To tell those three apart, use superheat and subcooling together:
| Symptom | Superheat | Subcooling | Likely cause |
|---|---|---|---|
| Low suction saturation temp | High | Low or zero | Undercharge |
| Low suction saturation temp | High | Normal (e.g. 10–12°F / 5–7 K) | Liquid line restriction |
| Low suction saturation temp | Low | Normal | Low indoor airflow |
The worked figures from the video:
- Superheat: 68°F suction line minus 22°F saturation = 46°F (about 26 K). Far too high.
- Subcooling: 81°F saturation minus 81°F liquid line = 0°F. No subcooling at all.
High superheat with no subcooling means the system is short of refrigerant.
Exam tip: Superheat is measured line temperature minus saturation temperature at the evaporator outlet. Subcooling is condensing saturation temperature minus liquid line temperature. These calculations come up again and again in 2079 assessments, so practise them until they’re automatic. A difference between two temperatures is quoted in kelvin (K), not °C.
Find the Leak Before You Charge
This is where UK law and good practice agree. The presenter had recovered refrigerant to set up the demonstration, so there was no leak. On a real job:
“If you did have a leak you would want to search for that leak and try to fix that leak before adding refrigerant… the customer will just be calling a couple days later.”
Under Article 3(3), a detected leak must be repaired without undue delay. Under Article 4, the repaired system must be checked by a certified person within one month. Topping up a leaking system breaches the regulation and wastes refrigerant.
Adding Refrigerant: Slowly, Into the Suction Side
Because liquid was going into the vapour line, the technician added it in small bursts:
- Open the manifold handle briefly, then close it and let the system settle.
- Listen for a change in compressor noise. It means you’re feeding liquid too fast and risk slugging the compressor.
- A quick-charge or metering adapter that flashes the liquid on the way in is a good alternative.
- If the evaporator iced up during a long undercharged run, turn the outdoor unit off and run the indoor fan to clear it before carrying on.
As the charge went in, the readings moved the right way:
- About 8 oz (≈225 g): suction saturation finally rose above 32°F.
- About 12 oz: superheat fell to around 23°F.
- About 15 oz (≈425 g): superheat around 10–11°F, and subcooling had appeared at about 7°F.
“It’s really not about pressures… the whole system works on temperature.”
That’s a good habit for the exam and on the job. Pressures only mean something once you’ve converted them to saturation temperatures on a PT chart.
Setting the Target Superheat
For a fixed orifice, the target superheat depends on the indoor wet bulb (measured in the return air) and the outdoor dry bulb temperature. With an indoor wet bulb of 54°F and 72–73°F outside, the manufacturer’s chart gave a target of about 7–8°F (≈4 K). The low heat load put the conditions close to the edge of the chart.
The final reading was 6–7°F of superheat, stable for several minutes. That was spot on. The technician deliberately didn’t push in the liquid left in the hose, because a zero-superheat condition would send saturated refrigerant back to the compressor.
The delta T across the indoor coil rose from 10°F to 17°F (about 9.5 K). That’s a useful extra check, but as the video says, you confirm the charge with superheat, not delta T.
Disconnecting, Leak Checking and Records
After charging, the technician:
- Closed the cylinder and disconnected the low side while the system was running.
- Disconnected the high side, either quickly or after shutting the system down so the pressure dropped.
- Checked the service ports with leak detection fluid.
- Refitted the caps, using locking caps where the public has access.
In the UK, you then complete the record. Under Article 6, the operator must keep records of the quantity and type of refrigerant added and recovered, the date, and the technician’s details. This system’s nameplate charge was 3.7 lb (about 1.68 kg) of R-410A. At a GWP of 2,088 that’s about 3.5 tonnes CO₂e, below the 5 tCO₂e threshold that triggers mandatory periodic leak checks under Article 4. Being able to do that conversion quickly is a core exam skill.
Key point: CO₂ equivalent = charge (kg) × GWP ÷ 1,000. Leak check frequency depends on tCO₂e, not kilograms.
How F-Gas Exam Prep Fits Into This
This one video covers several City & Guilds 2079 areas: refrigerant handling and cylinder use, system performance checks, leak checking obligations, record keeping and CO₂e calculations. The F-Gas Exam Prep app is built to help you practise exactly these:
- 370+ exam questions across all skill groups, covering superheat and subcooling diagnosis, Article 3 and 4 obligations, and more.
- Mock exams that mirror the real City & Guilds 2079 format, so you know what to expect on the day.
- AI voice challenges for interactive revision, for talking through fault diagnosis as you would with a colleague on site.
- Detailed explanations for every answer, so you understand why high superheat with zero subcooling means undercharge, rather than just memorising it.
Practise the calculations in the app before your practical assessment.
Start Practising Today
Download the F-Gas Exam Prep app and study with 460+ practice questions, mock exams, and detailed explanations.

