Superheat and Subcooling Explained: A Field Guide for F-Gas Candidates
Understand superheat and subcooling, where to measure them, and how each one verifies refrigerant charge on TEV and fixed-orifice systems.
Ask a room of trainee refrigeration engineers to define superheat and you will get a dozen answers, most of them half right. Ask them where to put the probe and which metering device changes the answer, and the room goes quiet. That gap matters, because superheat and subcooling sit right at the centre of City & Guilds 2079 assessment and at the centre of everything you do on a live system.
This walkthrough follows an explanation aimed squarely at apprentices — the sort you would give standing at a condensing unit with a gauge set in your hand — and then connects it to what the F-Gas assessment actually expects of you.
Where each measurement is taken
Before any theory, get the physical locations fixed in your head. The colour coding of a manifold set is not decoration — it maps directly onto the two measurements.
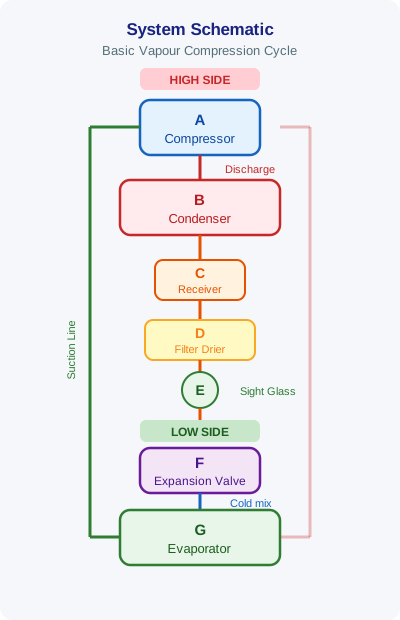
- Subcooling — taken at the outdoor unit’s liquid line service valve. Red gauge, red hose, high side, small-bore tube.
- Superheat — taken at the vapour (suction) line service valve. Blue gauge, blue hose, low side, large-bore tube.
“The vapour line is always larger than the liquid line.”
That single sentence saves apprentices from a lot of embarrassment. If you are unsure which port you are on, the tube diameter tells you.
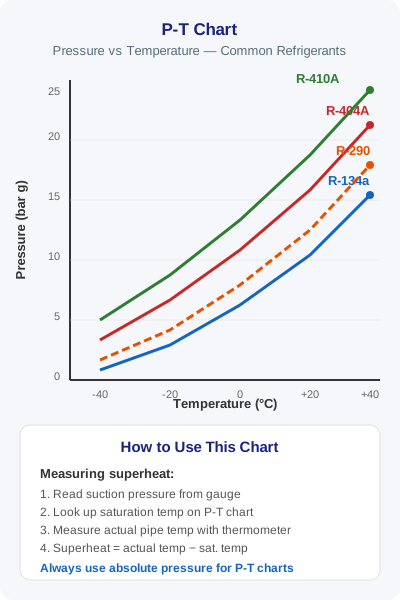
Both measurements need the same two inputs: a pressure reading converted to saturation temperature, and an actual line temperature taken with a digital probe within a few inches of the port.
What subcooling actually is
Subcooling is the lowering in temperature of liquid refrigerant once it has fully condensed.
Follow the refrigerant through the condenser. High-pressure, high-temperature vapour leaves the compressor and enters the coil. Air is drawn across the fins and rejected heat leaves the system. The refrigerant cools as a vapour until it reaches saturation — and at that point, something important happens:
“Once it gets to that point where you’re saturated, you’re no longer lowering in temperature, you’re just phase changing from a vapour to a liquid.”
Roughly halfway through the coil it becomes fully liquid. Only then can it start dropping in temperature again. That further temperature drop, below the saturation temperature, is your subcooling.
Here is the part that confuses people, and it is worth reading twice: you measure pressure in one state and temperature in another. The pressure you read at the liquid line port reflects the saturated condition inside the condenser coil. The temperature you read on the liquid line is the fully condensed refrigerant after it has shed additional heat. The difference between them is the subcooling.
Worked example (R-410A):
| Step | Reading |
|---|---|
| Liquid line pressure | 300 psig |
| Converted saturation temperature | 94 °F |
| Actual liquid line temperature | 84 °F |
| Subcooling | 10 K (10 °F) |
Older manifolds carry pressure–temperature scales printed on the gauge face — a green inner ring for R-22, a pink ring for R-410A. Digital manifolds do the conversion for you. Either way, the principle is identical: pressure gives you saturation temperature, nothing more.
What superheat actually is
Now follow the same refrigerant into the evaporator.
Subcooled liquid travels down the small liquid line and arrives at the metering device. The device drops the pressure, and dropping pressure drops temperature. What emerges through the distributor tubes is already a mixture — roughly 80% liquid and 20% flash gas. It enters the coil already saturated.
As it absorbs heat from the air crossing the coil, it does not get warmer. It boils:
- Entry: ~80% liquid / 20% vapour
- Midway: ~50% liquid / 50% vapour
- Later: ~20% liquid / 80% vapour
- Then: 100% vapour
Only at that final point, once every drop has boiled off, can the refrigerant start rising in temperature again. That temperature rise is superheat.
Measured at the evaporator outlet it is evaporator superheat. Measured out at the condensing unit, after the vapour line run, it is total superheat. On a correctly installed system with an insulated suction line the two should agree within a degree or so — unless, as the video notes, the line is buried or badly lagged.
Worked example (R-410A):
| Step | Reading |
|---|---|
| Suction pressure | 120 psig |
| Converted saturation temperature | 41 °F |
| Actual vapour line temperature | 54 °F |
| Total superheat | 13 K (13 °F) |
“The only reason we’re measuring pressure right here is to get a saturated temperature.”
Remember that when the examiner asks why suction pressure alone cannot tell you the charge.
Why the metering device decides the method
This is the exam-critical point, and it maps directly onto Skill Group 2 (system design and operating principles) and Skill Group 6 (charging and performance checks) in the City & Guilds 2079 framework.
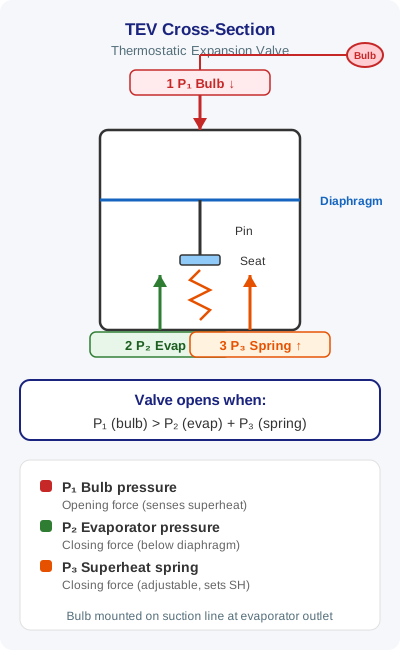
Thermostatic expansion valve (TEV / TXV) → charge by subcooling.
A TEV senses vapour line temperature via its bulb and vapour line pressure via its external equaliser, balanced against spring pressure. It opens and closes to hold superheat steady regardless of heat load:
“The whole point is that it’s monitoring the superheat and it’s adjusting the refrigerant flow to try to hold the superheat steady.”
Because the valve deliberately holds superheat constant, superheat cannot tell you whether the charge is right. Subcooling can. Compare your measured subcooling against the manufacturer’s target on the rating plate — and if it is not on the front, take the shroud off and look underneath.
- Measured subcooling higher than target → overcharged
- Measured subcooling lower than target → undercharged
A target of 14 K against a measured 10 K means the system needs refrigerant added.
Fixed orifice (capillary tube or piston) → charge by total superheat.
A piston chamber or cap tube has a fixed hole. It cannot modulate. The same restriction passes the same flow whatever the load, so superheat swings with both charge and conditions — which is exactly what makes it a usable charging indicator.
The tell-tale for identification: a bulb strapped to the suction line and an external equaliser line means TEV. No bulb, no equaliser — pull the cover and check what is fitted.
Target superheat is a moving number
Here is where apprentices most often go wrong. There is no target superheat printed on the rating plate, and there is no magic pressure to set.
“Target superheat with a system that has a fixed orifice is a moving number.”
To find the target you need two measurements:
- Indoor wet bulb temperature, taken at the return air with a digital psychrometer.
- Outdoor dry bulb temperature, taken near the condensing unit — out of direct sun and away from the discharge air.
Plot those two on a target superheat chart, or enter them into a digital manifold or app, and it gives you the target.
The same 13 K measurement means opposite things depending on that target:
- Target 17 K, measured 13 K → overcharged
- Target 9 K, measured 13 K → undercharged
Nothing about the reading itself tells you which. This is precisely the sort of interpretation question that catches candidates out under exam conditions.
Why this matters for F-Gas compliance
None of this is purely academic. Under Regulation (EU) 517/2014, correct charging is compliance work:
- Article 3 places a general obligation on operators to prevent leakage and to repair detected leaks without undue delay. Charging by guesswork — topping up until the sight glass clears, or setting to a fixed suction pressure — risks both overcharge and repeated top-ups that mask a genuine leak.
- Article 4 sets leak check frequencies by CO₂-equivalent charge (5 tonnes CO₂e and above, with intervals extending where an automatic leak detection system is fitted). Knowing the actual charge, and whether the system is holding it, underpins those duties.
- Article 6 requires records of quantities of refrigerant added and recovered. If you add refrigerant to correct low subcooling, that quantity is recordable.
- Regulation (EC) 1516/2007 sets out the standard leak checking requirements, including indirect methods — analysing measured parameters such as pressures, temperatures, superheat and subcooling against expected values to identify signs of loss.
That last point is worth emphasising for the 2079 assessment. Superheat and subcooling are not just charging tools; they are diagnostic parameters that feed directly into indirect leak checking. A system running low subcooling with no evidence of a service error should raise the question of where the refrigerant went.
Deliberate venting remains prohibited under Article 3(1), and recovery obligations under Article 8 apply whenever you remove refrigerant during servicing — so getting the charge right the first time avoids unnecessary recovery cycles as well.
How F-Gas Exam Prep Fits Into This
Reading a clear explanation of superheat and subcooling is one thing. Recalling it under exam pressure, when the question describes a system with a bulb and equaliser line and asks which measurement verifies the charge, is another.
The F-Gas Exam Prep app is built for exactly that gap:
- 370+ exam questions across all City & Guilds 2079 skill groups, including thermodynamics, system operating principles, and charging and performance checks.
- Mock exams that mirror the real City & Guilds 2079 format, so the pacing and question style are familiar before you sit the real thing.
- AI voice challenges — revise hands-free on the drive between jobs, answering aloud and getting feedback in the moment.
- Detailed explanations for every answer, so when you get a superheat interpretation question wrong, you find out precisely why the target changed and what the reading was telling you.
Work through the thermodynamics and charging skill groups until the metering-device rule is automatic: TEV means subcooling, fixed orifice means superheat. Get that reflex in place, and a large slice of both the written assessment and the practical becomes considerably less daunting.
Start Practising Today
Download the F-Gas Exam Prep app and study with 460+ practice questions, mock exams, and detailed explanations.