How to Find Refrigerant Leaks: A Practical Guide for F-Gas Technicians
Practical refrigerant leak detection tips: test your detector, inspect first, use nitrogen and bubbles properly, and keep looking after the first leak.
Leak detection is one of the most common jobs in refrigeration and air conditioning, and it’s one that many of us get wrong. In a recent HVAC School training meeting, the Kalos team talked through the mistakes technicians make when hunting for refrigerant leaks. Their advice was written for the US market, but most of it applies directly to UK work. In a few places UK law is stricter, and those differences come up in the 2079 exam.
This guide covers the practical lessons and explains where the retained F-Gas Regulation 517/2014 and Regulation (EC) No 1516/2007 (the standard leak checking requirements) apply.
Step One: Test Your Leak Detector
The team’s first point was simple: if you don’t know whether your detector works, you can’t trust a negative result.
“So, if somebody doesn’t know if their leak detector is working, what should they do next? They should test it.”
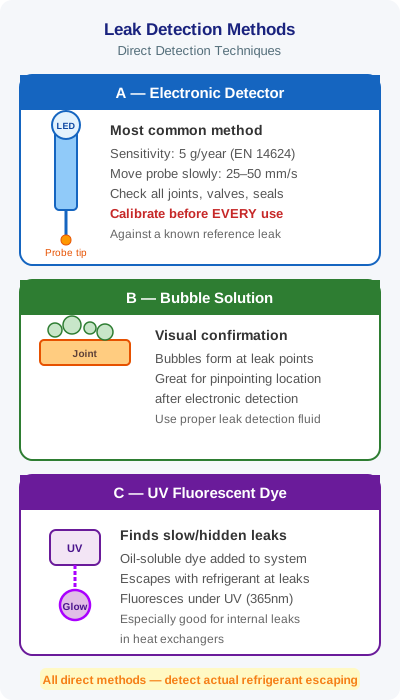
Most detectors come with a test vial of calibration fluid, usually a high-boiling-point refrigerant that evaporates slowly. The presenters pointed out that a vial doesn’t always behave like the refrigerant you’re working on. R410A, for example, is much harder to pick up than older refrigerants. Use a proper reference leak that matches your working conditions as closely as you can.
In the UK this is a legal requirement as well as good practice. Regulation 1516/2007 says electronic detection devices used for direct leak checks must be checked every 12 months and must detect leaks of at least 5 g per year. If you keep a calibration record, keep it up to date.
The US advice to “crack the cylinder” briefly to make a test leak doesn’t carry over to the UK. Article 3(1) of Regulation 517/2014 bans the intentional release of fluorinated gases. Use a certified reference leak instead.
If the detector fails the test, the team listed the usual causes:
- A blocked filter
- A pump that isn’t drawing air through the sensor
- A kinked or damaged probe hose
- A worn sensor. Heated diode sensors lose sensitivity over time.
Exam tip: Know the difference between direct methods (electronic detectors, leak-detection fluid, UV dye) and indirect methods (looking at pressures, temperatures and compressor current). Know when each one applies under Regulation 1516/2007.
Know Your Detector and Read the Manual
Heated diode and infrared detectors behave differently. An infrared unit compares the sample with ambient air. If you hold it still, it treats the surrounding concentration as the baseline and stops reporting the leak. Keep it moving.
Keeping it moving doesn’t mean waving it about. Whatever detector you use, move the probe slowly and steadily, about 25–50 mm per second, close to the joint or surface you’re checking.
The presenters gave an example. Some heated diode units let you adjust the sensor temperature. If you don’t reset that adjustment after fitting a new sensor, you overheat it and it dies within weeks. That’s in the manual, which is why you should read it.
Be Patient and Look Before You Sniff
The second big mistake was impatience. Pushing the probe into the evaporator drain and declaring the coil faulty after one beep is a guess. It isn’t a diagnosis.
One presenter described doing exactly that on a cased coil. They found refrigerant at the drain tee and condemned the evaporator. The senior engineer who came to fit the new coil found it had never been opened up, and the leak might have been a repairable rub-out. A drain-line hit tells you where to look. It doesn’t tell you what the fault is.
Do a visual inspection of the whole system before you take out any detector:
- Evaporator coil and distributor (feeder) tubes
- Service valves, before you connect your gauges
- Reversing valve and the heating-mode expansion device on heat pumps, where tubes often rub through
- The bottom of the condenser coil
- Brazed joints and pipework that vibrates
Oil staining is the most reliable visible sign. Start by looking at everything, then narrow down.
Key point: Connecting and disconnecting hoses releases a small amount of refrigerant, which can set off your detector at the outdoor unit. Inspect first, and if you must connect, start on the suction side.
Matching the Method to the Leak
The team’s general approach was:
- Outdoor units: inspect visually, then use leak-detection fluid. An electronic detector struggles outdoors because of wind and residual refrigerant.
- Indoor coils: use an electronic detector to find the area, then leak-detection fluid to find the exact point.
Leak-detection fluid doesn’t always produce obvious bubbles. Very small leaks form tiny clusters of foam, which the presenters called “cocooning”, and these can take a minute or more to appear. Give it time.
If a system is almost empty, for example R410A at only 3–4 bar static pressure, there is probably no liquid left. Recover what’s left, then pressurise with oxygen-free nitrogen (OFN) and find the leak by listening, with leak-detection fluid and by pressure decay.
The video suggested adding a little R22 as a trace gas. That is not an option in the UK: HCFCs can’t be used for servicing. The UK alternative is a 5% hydrogen / 95% nitrogen trace gas mixture with a hydrogen-sensitive detector. It’s non-flammable at that concentration and detectors pick it up well.
Important: You can’t detect nitrogen electronically because it makes up about 78% of the air. Pressure decay, listening, leak-detection fluid or a trace gas are your only tools.
No “Gas and Go”
The presenters spoke frankly about why technicians top up and leave. It’s late, you’re busy, and the customer wants the system cooling again. They pointed out that in the US, recharging a leaking small system isn’t illegal, just bad practice.
“Refrigerant doesn’t go anywhere on its own. So, it has a leak.”
In the UK, the rule is firmer. Under Article 3(2) of Regulation 517/2014, once a leak is found the operator must have it repaired without undue delay. Under Article 3(3), a certified person must check the system again within one month of the repair to confirm it worked. Under Article 6, systems at or above the record-keeping threshold must have their leak checks, repairs and refrigerant quantities recorded.
The team also gave advice about talking to customers:
- Never say “it’s only a small leak”. Leaks usually get bigger, and customers take “small” to mean whatever suits them.
- Never fit a part on the strength of someone else’s diagnosis, even a colleague’s. Check it yourself first.
- Explain the facts and the options clearly, and let the customer decide.
Don’t Stop at the First Leak
The final tip was that one leak may not be the only one. If a system is several kilograms short, a slow leak on the evaporator probably isn’t the whole story. Check the line set, brazed joints, pipework subject to vibration and the discharge line.
On heat pumps, you can confirm a suspected indoor-coil leak by running the system in heating mode for 30 seconds or so. That puts the indoor coil under high pressure. Then switch off and check it. Never push pressure beyond the system’s rated limits to “make” a leak show.
Weigh refrigerant in and out on a calibrated scale every time. You need accurate charge figures for your records, and they also show whether you have found every leak.
How F-Gas Exam Prep Fits Into This
Leak checking is a core part of the City & Guilds 2079 assessment, from Category I (which covers all activities) to Category IV (leak checking without breaking into the refrigerant circuit). You need to know the direct and indirect methods, detector sensitivity and calibration requirements, leak check frequencies by CO₂ equivalent, follow-up checks after a repair, and the record-keeping duties under Articles 3, 4 and 6.
F-Gas Exam Prep covers all of this:
- 370+ exam questions across all skill groups, including leak detection and regulatory duties
- Mock exams in the real City & Guilds 2079 format, so the assessment holds no surprises
- AI voice challenges for interactive revision when you’re on the go
- Detailed explanations for every answer, so you understand why the answer is right as well as what it is
Good leak detection depends on patience, the right tools and knowing the law. Download F-Gas Exam Prep and go into your assessment ready for the leak checking questions.
Start Practising Today
Download the F-Gas Exam Prep app and study with 500+ practice questions, mock exams, and detailed explanations.